
NVH Source Locator ialah alat pengukuran untuk mencari sumber bunyi dan getaran menggunakan TDOA (Time Difference of Arrival) daripada isyarat akselerometer yang ditangkap pada osiloskop atau sistem pengukuran.
Panduan ini merangkumi semua ciri. Untuk peringatan ringkas, lihat Rujukan Pantas.
Apabila sumber bunyi memancarkan bunyi atau getaran, gelombang bergerak melalui bahan pada kelajuan yang diketahui. Jika anda meletakkan dua atau lebih akselerometer pada bahan dan mengukur bila gelombang tiba pada setiap satu, perbezaan masa memberitahu anda di mana sumber itu.
NVH Source Locator mengambil:
Kemudian ia mengira di mana sumber berada pada struktur.
Semakin banyak sensor anda gunakan, semakin tepat anda boleh menentukan sumber:
Anda akan memerlukan:
Aplikasi mempunyai tab di bahagian atas:

| Tab | Apa yang dilakukan | Bila digunakan |
|---|---|---|
| 2-Sensor | Penyetempatan sumber 1D sepanjang garis antara 2 sensor | Pemeriksaan pantas, struktur seperti rasuk. Sepenuhnya percuma. |
| 3-Sensor | Penyetempatan sumber 2D menggunakan 3 sensor dalam segi tiga | Penggunaan paling umum, panel dan permukaan |
| 3-Sen+ | 3-Sensor dengan penyelesai kuasa dua terkecil yang ditentukan berlebihan | Pengukuran lebih menuntut, tahan hingar |
| 4-Sensor | Penyetempatan 2D menggunakan dua pasangan (A-B + C-D) | Susun atur sensor segi empat tepat, semakan silang |
| 4-Sen+ | Mod 2D lanjutan, 4 sensor di mana-mana kedudukan | Geometri bukan segi empat tepat, LSQ penuh |
| 3D | Penyetempatan sumber 3D menggunakan 4 sensor dengan koordinat XYZ | Struktur kompleks dalam ruang 3D |
| 3D+ | 3D dengan sehingga 6 sensor, LSQ yang ditentukan berlebihan | Geometri sangat kompleks, ketepatan maksimum |
| Materials | Perpustakaan kelajuan bunyi + bahan tersuai | Pilih sekali setiap sesi pengukuran |
| Help | Tutorial dalam aplikasi dan rujukan | Apabila anda memerlukan peringatan ringkas |
Percuma vs Pro: Tab 2-Sensor sepenuhnya percuma. Tab lain boleh diakses tetapi mempunyai medan input tertentu yang dikunci untuk pengguna Pro (ditanda dengan lencana mangga emas). Mengetuk medan yang dikunci memaparkan paywall Pro.
Tetapan diakses melalui ikon gear ⚙ di sudut kanan atas (bukan tab).
Pengukuran paling mudah: penyetempatan sumber sepanjang garis antara dua akselerometer.
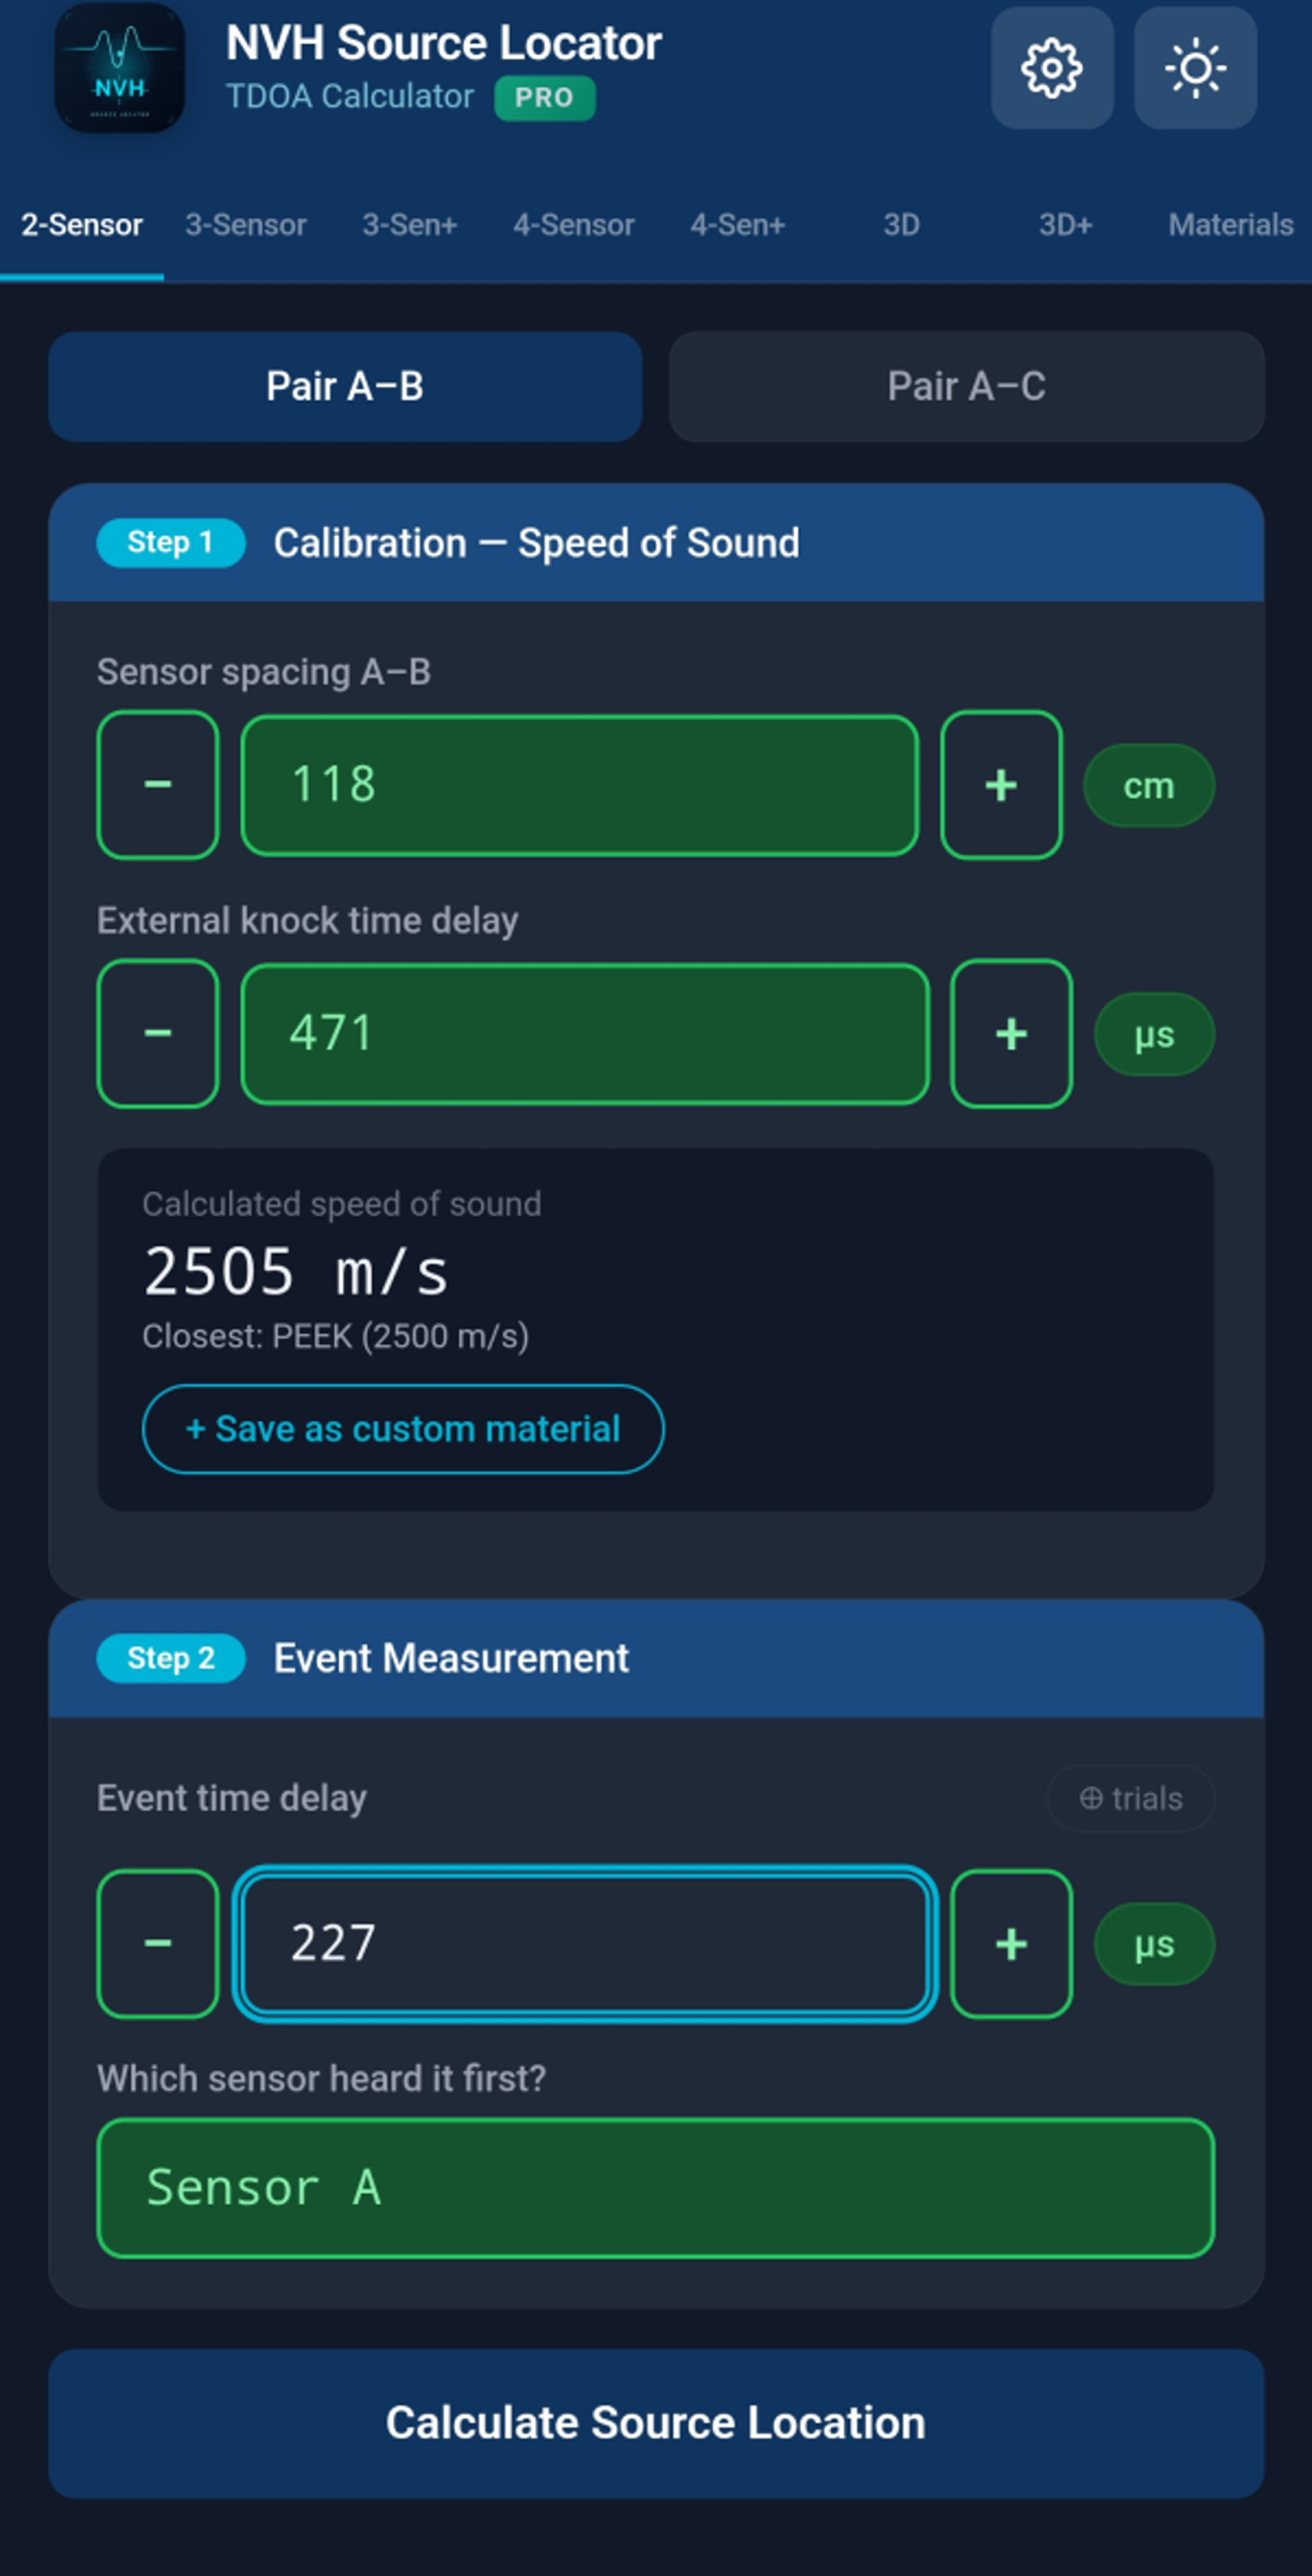
Ketik tab Materials. Pilih bahan yang menjadikan struktur anda (cth. "Aluminium", "Keluli, Mild (1020)"). Aplikasi menggunakan kelajuan bunyi bahan yang diketahui untuk mengisi medan masa penentukuran secara automatik.
Jika bahan struktur anda tiada dalam senarai, anda boleh memilih "Udara" sementara dan menulis ganti masa penentukuran secara manual dalam langkah 2.
Pada tab 2-Sensor, anda akan melihat dua bahagian pasangan: Pasangan A–B dan Pasangan A–C (hanya A–B diperlukan jika anda hanya mempunyai 2 sensor).
Untuk setiap pasangan, anda mengisi:
d): jarak fizikal antara sensor, dalam cm atau inci (ditetapkan dalam Tetapan)tCal): masa untuk gelombang menempuh antara sensor pada kelajuan bunyi bahan — auto-isi apabila anda memilih bahan, tetapi anda boleh menulis gantitEvent): perbezaan masa antara sensor yang mengesan peristiwa bunyi, dalam mikrosaatAplikasi memaparkan kedudukan sumber sebagai jarak dari sensor A: - Hasil = 0: sumber berada di sensor A - Hasil = jarak: sumber berada di sensor B - Hasil di antara: sumber berada di antara mereka - Hasil di luar: sumber berada di luar salah satu sensor (toast akan memberi amaran)
Kad hasil menunjukkan kedua-dua jarak (dari A, dari B) dan menunjukkan sensor mana yang lebih dekat.
Ketik 📷 Anotasi foto untuk mengambil foto persediaan anda. Aplikasi menindih penanda untuk sensor A, B dan sumber. Berguna untuk laporan.
Mencari sumber pada satah 2D menggunakan tiga sensor yang disusun dalam segi tiga.

Letakkan tiga sensor pada struktur anda membentuk segi tiga. Sama sisi, tepat, atau tidak sama sisi — aplikasi mengendalikan semua geometri.
Dalam bahagian Panjang sisi segi tiga, masukkan jarak fizikal untuk ketiga-tiga sisi (A–B, A–C, B–C).
Untuk setiap pasangan (A–B dan A–C), masukkan: - tCal: masa penentukuran (auto-isi daripada bahan) - tEvent: perbezaan masa yang diukur untuk peristiwa bunyi - Sensor pertama: yang mendengarnya terlebih dahulu
Aplikasi memaparkan kedudukan sumber sebagai koordinat X, Y relatif kepada sensor A (sensor A di asal, sensor B pada paksi X). Visualisasi menunjukkan ketiga-tiga sensor dan lokasi sumber.

Beberapa tab lanjutan menawarkan penyelesai yang ditentukan berlebihan dan dimensi yang lebih tinggi:
Persediaan segi tiga yang sama dengan 3-Sensor, tetapi kalibrasi DAN ukur ketiga-tiga pasangan (A–B, A–C, B–C). Penyelesai menggunakan ketiga-tiga TDOA dalam padanan kuasa dua terkecil — lebih kukuh terhadap hingar pengukuran dan bahan anisotropik. Baki setiap pasangan dilaporkan supaya anda boleh mengesan pengukuran yang tidak konsisten.
Letakkan empat sensor di sekitar kawasan: - A–B = pasangan mendatar (sisi kiri/kanan) - C–D = pasangan menegak (sisi atas/bawah)
Jalankan pasangan A–B dahulu (mendatar), kemudian pasangan C–D (menegak). Peta 2D memaparkan persilangan. Setiap pasangan dikalibrasi secara berasingan — berguna apabila bahan berbeza-beza merentas struktur.
Empat sensor di mana-mana kedudukan (tidak dipaksa segi empat tepat). Padankan A dengan setiap B, C, D dan kalibrasi secara berasingan. Penyelesai kuasa dua terkecil yang ditentukan berlebihan merata-ratakan hingar pengukuran setiap pasangan dan melaporkan baki setiap pasangan.
Pengukuran 3D penuh dengan 4 sensor diletakkan dalam ruang 3D. Masukkan koordinat (X, Y, Z) setiap sensor, tambah masa penentukuran dan peristiwa untuk setiap pasangan (A–B, A–C, A–D).
Seperti 3D tetapi menyokong sehingga 6 sensor (A hingga F) dengan LSQ yang ditentukan berlebihan. Ketepatan maksimum untuk geometri 3D yang kompleks.
Perpustakaan bahan kejuruteraan biasa dengan kelajuan bunyi yang diketahui pada 20 °C.

Senarai termasuk udara, bendalir, getah, polimer, kayu, kaca, dan logam. Kelajuan berjulat dari ~340 m/s (udara) hingga ~13,000 m/s (beberapa logam pada suhu bilik).
14 logam yang biasa digunakan termasuk data pekali suhu. Apabila Suhu rujukan dalam Tetapan berbeza daripada 20 °C, aplikasi melaraskan kelajuan bahan ini secara automatik:
Bahan dengan pampasan menunjukkan dua nilai dalam pemilih: kelajuan terpampas (besar, menonjol) dan kelajuan rujukan pada 20 °C (kecil, kelabu di bawah).
Bahan tanpa pampasan menunjukkan "ref only" dalam huruf condong — kelajuan yang disenaraikan mereka digunakan apa adanya tanpa mengira suhu.
Jika anda mengukur penentukuran pada tab 2-Sensor, anda boleh menyimpan hasilnya sebagai bahan tersuai. Selepas pengukuran 2-sensor yang berjaya, cari pilihan untuk menyimpan kelajuan terbitan di bawah nama pilihan anda.
Bahan tersuai menyimpan kelajuan yang diukur in-situ; mereka tidak pernah menggunakan pampasan suhu (kelajuan sudah diukur pada suhu ujian).
Ketik bintang di sebelah mana-mana bahan untuk menandakannya sebagai kegemaran. Kegemaran muncul di bahagian atas senarai untuk akses pantas.
Gunakan bar carian di bahagian atas untuk menapis bahan mengikut nama. Carian sepadan dengan nama kanonik Inggeris dan nama paparan yang diterjemahkan.
Kelajuan bunyi dalam bahan berubah dengan suhu. Dalam ujian NVH automotif, ini penting: bay enjin pada 80 °C, kabin direndam sejuk pada -10 °C, atau kawasan manifold ekzos pada 200 °C semuanya berkelakuan berbeza daripada keadaan makmal suhu bilik.
Buka Tetapan (ikon ⚙) → Suhu rujukan. Masukkan suhu persekitaran ujian anda dalam °C (julat -40 hingga +200).

Suhu rujukan sentiasa ditetapkan semula kepada 20 °C apabila anda melancarkan aplikasi. Ini menghalang tetapan basi daripada sesi pengukuran lalu daripada mempengaruhi kerja hari ini secara senyap. Nota condong kecil dalam Tetapan mengingatkan anda tentang tingkah laku ini.
Jika anda ingin memainkan semula pengukuran sejarah pada suhu asalnya, hanya ketik entri — suhu dipulihkan secara automatik.
Kebanyakan bahan bukan logam tidak mempunyai pekali suhu yang diterbitkan secara boleh dipercayai. Aplikasi menunjukkan lencana "ref only" untuk ini — kelajuan yang disenaraikan mereka digunakan tanpa mengira tetapan suhu. Jika anda memerlukan pengukuran tepat pada suhu bukan bilik untuk bahan ini, lakukan penentukuran in-situ dan simpan hasilnya sebagai bahan tersuai.
Selepas pengiraan yang berjaya, ketik butang 📷 Anotasi foto untuk menindih penanda sensor dan sumber pada foto persediaan anda.

Foto yang dianotasi disertakan secara automatik dalam laporan PDF.
Ketik butang Cetak hasil pada mana-mana skrin hasil untuk menjana laporan berformat.

Tetapan → Pengepala laporan. Masukkan nama syarikat anda, nama makmal, info projek, atau apa-apa yang anda mahu di bahagian atas setiap laporan.
Simpan semua bahan tersuai, kegemaran, tetapan, dan sejarah anda ke satu fail. Pindahkan antara peranti.
Tetapan → Sandaran → ketik "Simpan fail sandaran". Aplikasi menjana fail JSON dan membuka helaian kongsi telefon anda. Simpan ke pemacu awan anda (Google Drive, iCloud, OneDrive), e-mel kepada diri sendiri, atau pindahkan dengan cara apa pun yang anda suka.
Tetapan → Pemulihan → pilih fail sandaran daripada storan telefon anda. Aplikasi mengimport bahan tersuai, kegemaran, sejarah, dan tetapan.
⚠️ Pemulihan menggantikan data semasa anda. Jika anda mempunyai pengukuran penting pada peranti semasa, sandarkan dahulu sebelum memulihkan daripada sandaran yang berbeza.
Diakses melalui ikon gear ⚙ di sudut kanan atas. Tetapan ialah modal, bukan tab.
| Tetapan | Apa yang dikawalnya |
|---|---|
| Naik taraf ke Pro | Beli atau ketahui tentang ciri Pro ($19.99) |
| Bahasa | Bahasa paparan aplikasi (30 disokong) |
| Tema | Terang, Gelap, atau Auto (ikut sistem) |
| Unit jarak | cm atau inci |
| Suhu rujukan | Suhu aktif untuk pampasan, -40 hingga +200 °C |
| Pengepala laporan | Teks tersuai di bahagian atas laporan yang dijana |
| Sandaran | Eksport semua data ke fail |
| Pemulihan | Import data daripada fail sandaran |
| Pulihkan pembelian | Dapatkan semula Pro pada peranti baru |
NVH Source Locator menggunakan model freemium dengan kunci ciri:
Medan yang memerlukan Pro tersebar di: - 3-Sensor, 3-Sen+, 4-Sensor, 4-Sen+ - Mod 3D dan 3D+ - Sandaran dan Pemulihan - Laporan PDF - Bahan tersuai - Anotasi foto
Pengguna percuma boleh MEMBUKA mana-mana tab dan MELIHAT antara muka. Mereka hanya tidak boleh memasukkan nilai ke dalam medan input yang dikunci Pro.


Apabila pengguna percuma mengetuk medan yang dikunci, paywall meluncur masuk menunjukkan: - Ikon aplikasi dengan lencana PRO - Senarai ciri - Butang buka kunci dengan harga ($19.99 lalai; mungkin berbeza mengikut wilayah) - Tebusan kod promo (Android sahaja — iOS menggunakan aliran Kod Tawaran Apple yang berasingan) - Pautan promo pilihan ke saluran komuniti
Ketik mana-mana medan yang dikunci, atau ketik Naik taraf ke Pro dalam Tetapan. Menggunakan sistem pembayaran rasmi platform anda (Google Play pada Android, Apple App Store pada iOS).
Jika anda membeli pada satu peranti dan mahu Pro pada peranti lain (akaun yang sama):
Jika anda menebus kod promo di Google Play Store atau App Store semasa NVH Source Locator berjalan di latar belakang, kembali ke aplikasi secara automatik mengesan pembelian baru dan membuka kunci Pro — tiada Pemulihan manual diperlukan.
Android: butang "Ada kod promo Google Play?" dalam paywall membuka aliran tebusan Google Play dengan kod anda yang sudah diisi terlebih dahulu.
iOS: Polisi App Store 3.1.1 memerlukan tebusan melalui aliran "Tebus Kod" rasmi Apple. Butang Google Play disembunyikan pada iOS. Cari "Tebus kod App Store" dalam Tetapan sebaliknya.
Tab Help termasuk tutorial dalam aplikasi, panduan amalan terbaik, dan maklumat rujukan.

Topik yang dibincangkan: - Apakah peralatan yang anda perlukan - Cara meletakkan sensor untuk ketepatan terbaik - Petua penentukuran - Senario pengukuran biasa - Petua untuk triangulasi dan penempatan 3D - Penghalaan kabel dan kualiti isyarat
tCal yang diisi secara automatik mengandaikan kelajuan bahan yang diterbitkan — bahan sebenar berbeza-beza. Penentukuran paling tepat ialah in-situ: ketik lokasi yang diketahui dan biarkan aplikasi menerbitkan kelajuan sebenar.Matematik berkata sumber tidak berada di antara sensor anda. Kemungkinan punca: - Sumber sebenarnya di luar garis/satah sensor - Salah satu input anda salah - Kelajuan penentukuran terlalu jauh daripada realiti
Kelajuan bunyi tersirat daripada input anda jauh daripada mana-mana bahan biasa (kurang daripada 50 m/s atau lebih daripada 20,000 m/s). Semak input anda — kemungkinan kesilapan taip dalam tCal atau jarak.
Semak Suhu rujukan dalam Tetapan. Jika tidak 20 °C, kelajuan yang dipaparkan mencerminkan pampasan suhu. Aplikasi memaparkan "ref X @ 20°C" di bawah kelajuan terpampas supaya anda boleh mengesahkan.
Entri sejarah lama yang dibuat sebelum versi aplikasi 1.75 mungkin tidak menyimpan suhu. Jika anda mengambil pengukuran pada suhu bukan 20 °C, main semula akan menggunakan tetapan semasa. Tetapkan suhu secara manual dalam Tetapan sebelum main semula, ATAU ukur semula.
Penanda diletakkan secara automatik berdasarkan geometri input. Seret mereka untuk melaraskan. Melaraskan penanda mengemas kini kedudukan sumber dalam tindihan foto — tetapi TIDAK mengubah hasil pengiraan yang mendasari.
Pastikan anda menggunakan fail sandaran yang dijana oleh versi aplikasi yang sama atau lebih baru. Fail sandaran lama mungkin kekurangan medan data semasa.
Mengikut reka bentuk: apabila anda menanggalkan fokus daripada medan berangka (ketik di tempat lain), jika ia kosong, negatif, atau mengandungi teks bukan berangka, ia melompat ke 0. Mencegah pengiraan yang rosak secara senyap daripada input yang dipadamkan secara tidak sengaja. Input suhu dikecualikan (sebaliknya ia dipaksa ke -40/+200).
Hubungi support@evdiag.net dengan:
- Model peranti dan versi OS anda
- Versi aplikasi (Tetapan → bahagian bawah halaman)
- Penerangan tentang apa yang anda cuba
- Tangkapan skrin jika boleh
NVH Source Locator dibangunkan oleh EVDiag. Lawati https://evdiag.net untuk kemas kini dan sumber.