
NVH Source Locator is a measurement tool for locating noise and vibration sources using TDOA (Time Difference of Arrival) from accelerometer signals captured on an oscilloscope or measurement system.
This guide covers all features. For a quick refresher, see Quick Reference.
When a noise source emits a sound or vibration, the wave travels through a material at a known speed. If you place two or more accelerometers on the material and measure when the wave arrives at each one, the time difference tells you where the source is.
NVH Source Locator takes:
Then it calculates where on the structure the source is located.
The more sensors you use, the more accurately you can pin down the source:
You'll need:
The app has tabs along the top:

| Tab | What it does | When to use |
|---|---|---|
| 2-Sensor | 1D source location along a line between 2 sensors | Quick checks, beam-like structures. Fully free. |
| 3-Sensor | 2D source location using 3 sensors in a triangle | Most general use, panels and surfaces |
| 3-Sen+ | 3-Sensor with over-determined least-squares solver | More demanding measurements, noise-robust |
| 4-Sensor | 2D location using two pairs (A-B + C-D) | Rectangular sensor layouts, cross-checking |
| 4-Sen+ | Advanced 2D mode, 4 sensors at any positions | Non-rectangular geometries, full LSQ |
| 3D | 3D source location using 4 sensors with XYZ coords | Complex structures in 3D space |
| 3D+ | 3D with up to 6 sensors, over-determined LSQ | Very complex geometries, maximum precision |
| Materials | Speed-of-sound library + custom materials | Pick once per measurement session |
| Help | In-app tutorials and reference | When you need a quick refresher |
Free vs Pro: The 2-Sensor tab is fully free. Other tabs are accessible but have specific input fields locked to Pro users (marked with a gold padlock badge). Tapping a locked field shows the Pro paywall.
Settings is accessed via the ⚙ gear icon in the top-right corner (not a tab).
The simplest measurement: source location along a line between two accelerometers.
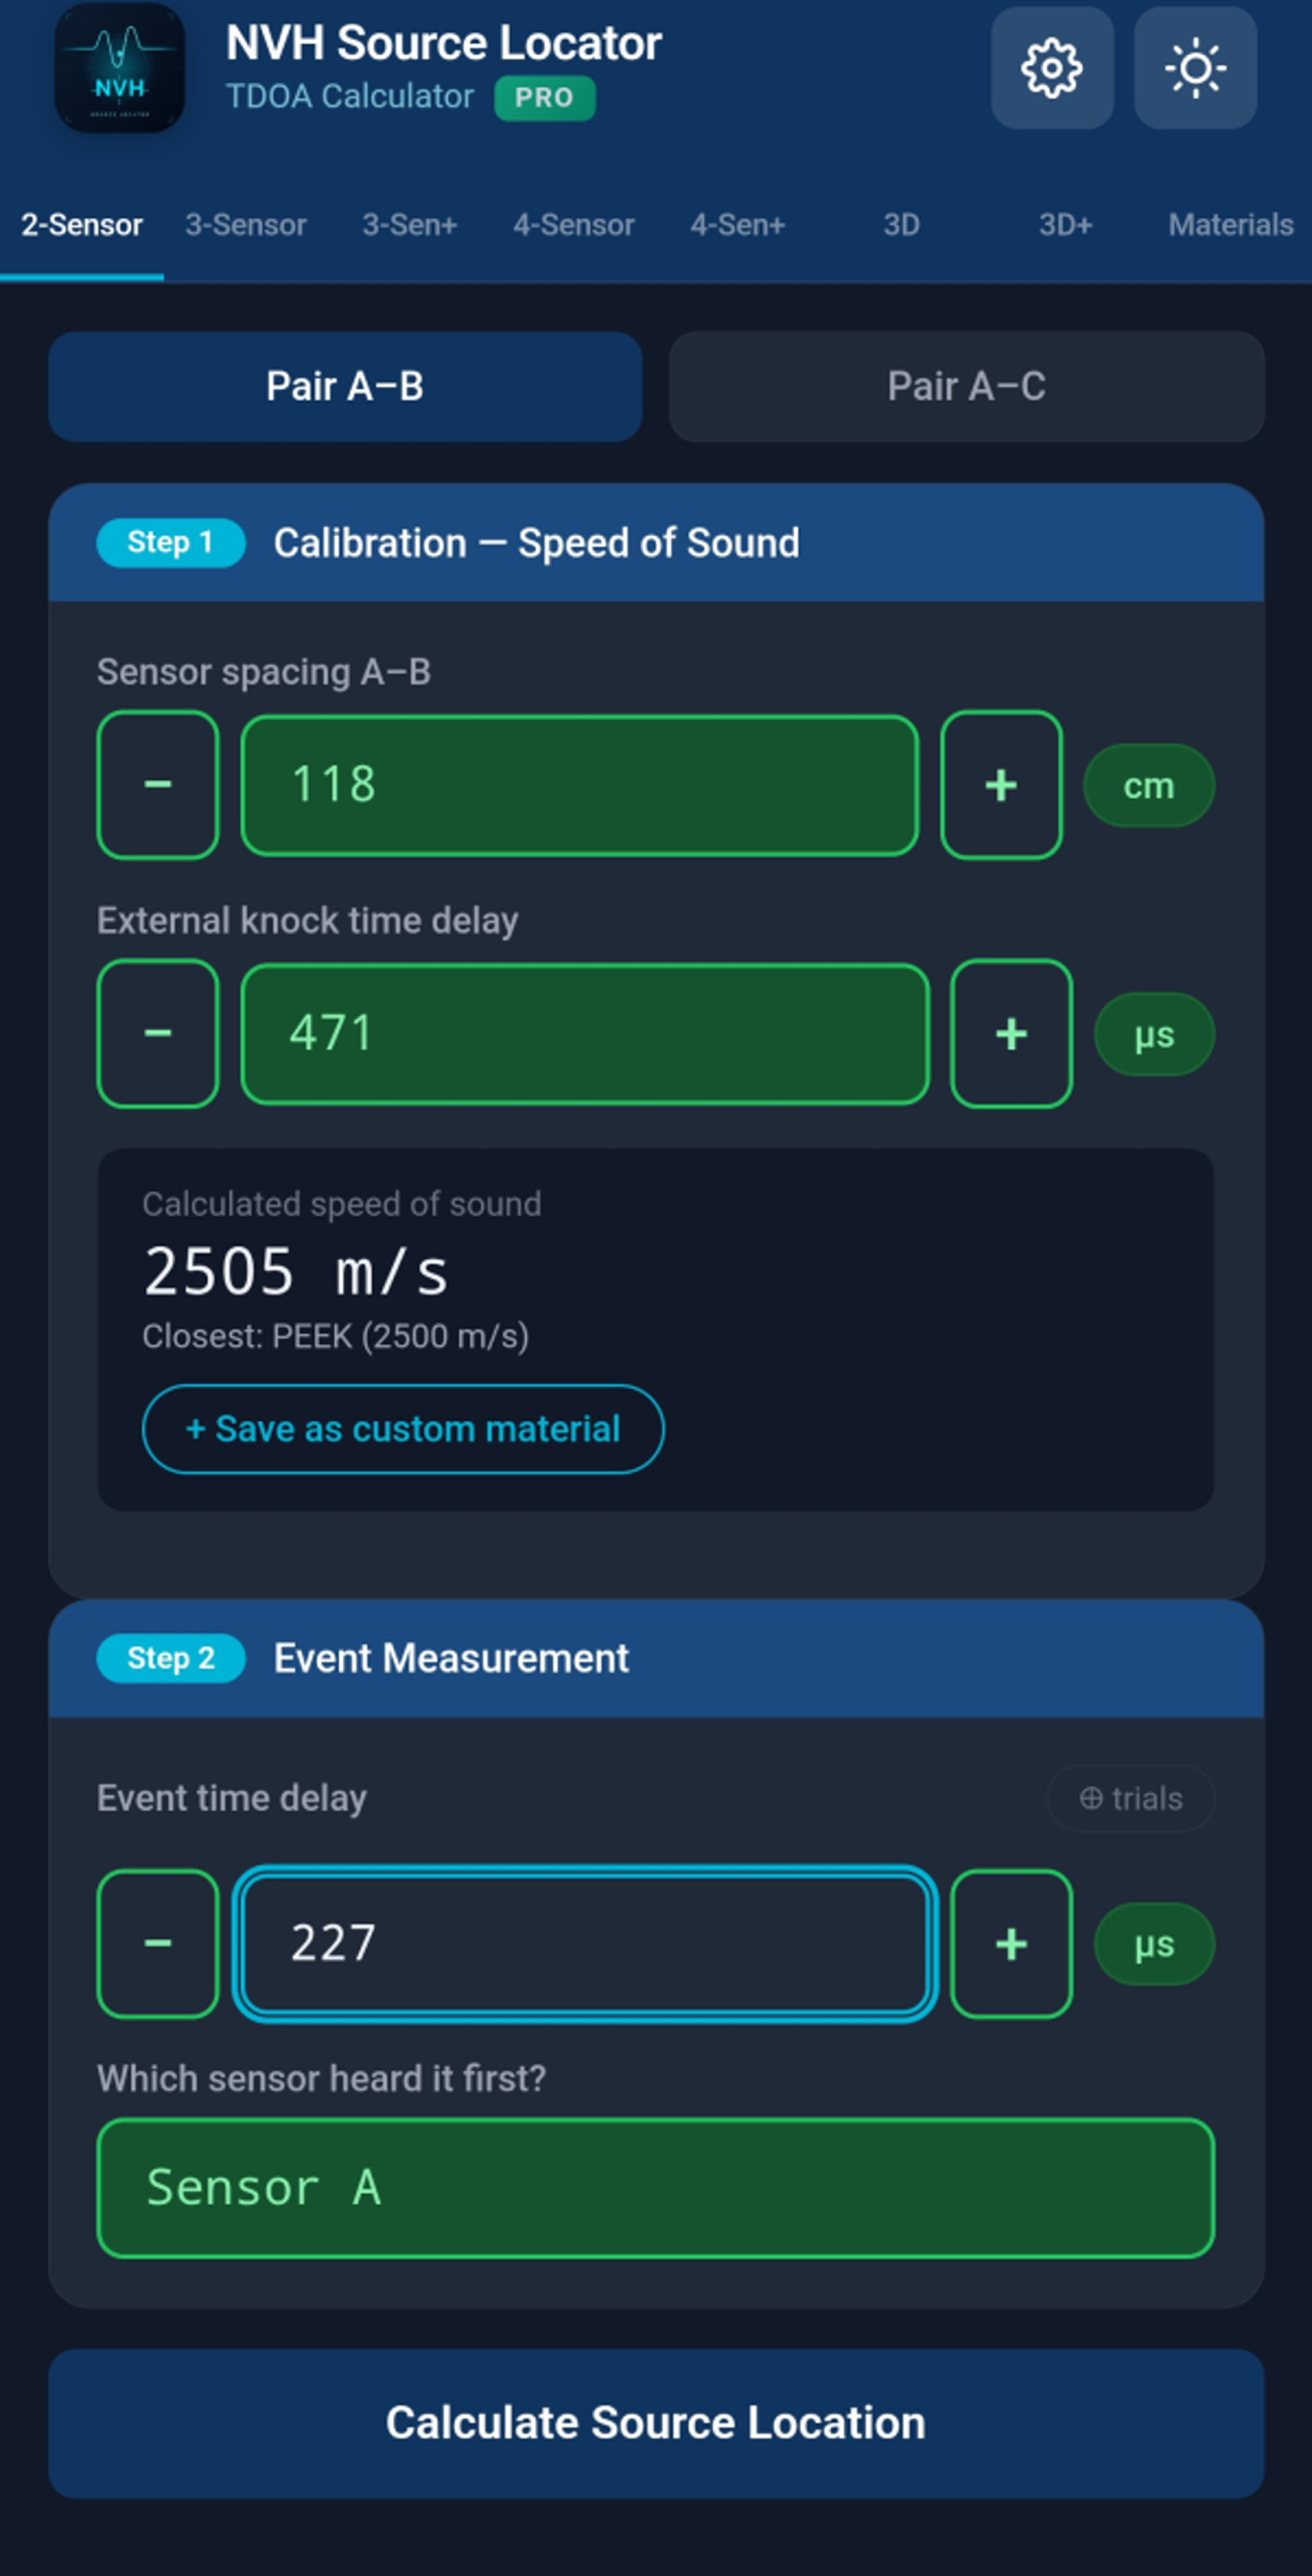
Tap the Materials tab. Pick the material your structure is made from (e.g., "Aluminium", "Steel, Mild (1020)"). The app uses the material's known speed of sound to populate the calibration time field automatically.
If your structure's material isn't in the list, you can pick "Air" temporarily and override the calibration time manually in step 2.
On the 2-Sensor tab, you'll see two pair sections: Pair A–B and Pair A–C (only A–B is required if you only have 2 sensors).
For each pair you fill in:
d): physical distance between sensors, in cm or inches (set in Settings)tCal): time for a wave to travel between the sensors at the material's speed of sound — auto-filled when you pick a material, but you can overridetEvent): time difference between sensors detecting the noise event, in microsecondsThe app shows the source position as a distance from sensor A:
- Result = 0: source is at sensor A
- Result = distance: source is at sensor B
- Result between: source is between them
- Result outside: source is beyond one of the sensors (toast will warn)
The result card shows both distances (from A, from B) and indicates which sensor is closer.
Tap 📷 Annotate photo to take a photo of your setup. The app overlays markers for sensors A, B and the source. Useful for reports.
Locates a source on a 2D plane using three sensors arranged in a triangle.

Place three sensors on your structure forming a triangle. Equilateral, right-angle, or scalene — the app handles all geometries.
In the Triangle side lengths section, enter the physical distance for all three sides (A–B, A–C, B–C).
For each pair (A–B and A–C), enter: - tCal: calibration time (auto-fills from material) - tEvent: measured time difference for the noise event - First sensor: which heard it first
The app shows the source position as X, Y coordinates relative to sensor A (sensor A at origin, sensor B on the X-axis). The visualization shows all three sensors and the source location.

Several advanced tabs offer over-determined solvers and higher dimensionality:
Same triangle setup as 3-Sensor, but calibrate AND measure all three pairs (A–B, A–C, B–C). The solver uses all 3 TDOAs in a least-squares fit — more robust to measurement noise and anisotropic materials. Per-pair residuals are reported so you can spot inconsistent measurements.
Place four sensors around the area: - A–B = horizontal pair (left/right sides) - C–D = vertical pair (top/bottom sides)
Run the A–B pair first (horizontal), then C–D pair (vertical). The 2D map shows the intersection. Each pair is calibrated separately — useful when material varies across the structure.
Four sensors at any positions (not forced rectangular). Pair A with each of B, C, D and calibrate separately. Over-determined least-squares solver averages out per-pair measurement noise and reports per-pair residuals.
Full 3D measurement with 4 sensors placed in 3D space. Enter each sensor's (X, Y, Z) coordinates, plus calibration and event times for each pair (A–B, A–C, A–D).
Like 3D but supports up to 6 sensors (A through F) with over-determined LSQ. Maximum precision for complex 3D geometries.
Library of common engineering materials with known speed of sound at 20 °C.

The list includes air, fluids, rubbers, polymers, woods, glasses, and metals. Speeds range from ~340 m/s (air) to ~13,000 m/s (some metals at room temperature).
14 commonly-used metals include temperature coefficient data. When the Reference temperature in Settings differs from 20 °C, the app automatically adjusts these materials' speeds:
Materials with compensation show two values in the picker: the compensated speed (large, prominent) and the reference speed at 20 °C (small, gray underneath).
Materials without compensation show "ref only" in italic — their listed speed is used as-is regardless of temperature.
If you measure a calibration on the 2-Sensor tab, you can save the result as a custom material. After a successful 2-sensor measurement, look for the option to save the derived speed under a name of your choice.
Custom materials store the in-situ measured speed; they never apply temperature compensation (the speed was already measured at the test temperature).
Tap the star next to any material to mark it as a favorite. Favorites appear at the top of the list for quick access.
Use the search bar at the top to filter materials by name. Search matches both English canonical names and translated display names.
The speed of sound in materials changes with temperature. In automotive NVH testing this matters: an engine bay at 80 °C, a cold-soaked cabin at -10 °C, or an exhaust manifold area at 200 °C all behave differently from room-temperature laboratory conditions.
Open Settings (⚙ icon) → Reference temperature. Enter your test environment's temperature in °C (range -40 to +200).

The Reference temperature always resets to 20 °C when you launch the app. This prevents stale settings from a past measurement session silently affecting today's work. A small italic note in Settings reminds you of this behavior.
If you want to replay a historical measurement at its original temperature, just tap the entry — the temperature is restored automatically.
Most non-metal materials don't have reliable published temperature coefficients. The app shows a "ref only" badge for these — their listed speed is used regardless of the temperature setting. If you need accurate measurements at non-room temperatures for these materials, perform an in-situ calibration and save the result as a custom material.
After a successful calculation, tap the 📷 Annotate photo button to overlay sensor and source markers on a photo of your setup.

The annotated photo is included automatically in PDF reports.
Tap the Print result button on any result screen to generate a formatted report.

Settings → Report header. Enter your company name, lab name, project info, or whatever you want at the top of every report.
Save all your custom materials, favorites, settings, and history to a single file. Transfer between devices.
Settings → Backup → tap "Save backup file." The app generates a JSON file and opens your phone's share sheet. Save it to your cloud drive (Google Drive, iCloud, OneDrive), email it to yourself, or transfer it any way you like.
Settings → Restore → pick the backup file from your phone's storage. The app imports custom materials, favorites, history, and settings.
⚠️ Restore replaces your current data. If you have important measurements on the current device, back them up first before restoring from a different backup.
Access via the ⚙ gear icon in the top-right corner. Settings is a modal, not a tab.
| Setting | What it controls |
|---|---|
| Upgrade to Pro | Buy or learn about Pro features ($19.99) |
| Language | App display language (30 supported) |
| Theme | Light, Dark, or Auto (follow system) |
| Distance unit | cm or inches |
| Reference temperature | Active temperature for compensation, -40 to +200 °C |
| Report header | Custom text at the top of generated reports |
| Backup | Export all data to a file |
| Restore | Import data from a backup file |
| Restore purchase | Re-acquire Pro on a new device |
NVH Source Locator uses a feature-locked freemium model:
Pro-required fields are scattered across: - 3-Sensor, 3-Sen+, 4-Sensor, 4-Sen+ - 3D and 3D+ modes - Backup and Restore - PDF reports - Custom materials - Photo annotation
A free user can OPEN any tab and SEE the interface. They just can't enter values into the Pro-locked input fields.


When a free user taps a locked field, the paywall slides in showing: - App icon with PRO badge - Feature list - Unlock button with price ($19.99 default; may vary by region) - Promo code redemption (Android only — iOS uses Apple's separate Offer Code flow) - Optional promo link to community channels
Tap any locked field, or tap Upgrade to Pro in Settings. Uses your platform's official payment system (Google Play on Android, Apple App Store on iOS).
If you purchased on one device and want Pro on another (same account):
If you redeem a promo code in the Google Play Store or App Store while NVH Source Locator is running in the background, returning to the app automatically detects the new purchase and unlocks Pro — no manual Restore needed.
Android: a "Have a Google Play promo code?" button in the paywall opens the Google Play redemption flow with your code pre-filled.
iOS: App Store policy 3.1.1 requires redemption through Apple's official "Redeem code" flow. The Google Play button is hidden on iOS. Look for "Redeem App Store code" in Settings instead.
The Help tab includes in-app tutorials, best-practice guides, and reference information.

Topics covered: - What equipment you need - How to place sensors for best accuracy - Calibration tips - Common measurement scenarios - Tips for triangulation and 3D placements - Cable routing and signal quality
tCal assumes published material speed — real-world materials vary. The most accurate calibration is in-situ: tap a known location and let the app derive the actual speed.The math says the source is not between your sensors. Possible causes: - The source actually is outside the sensor line/plane - One of your inputs is wrong - The calibration speed is too far off from reality
The implied speed of sound from your inputs is far from any common material (less than 50 m/s or more than 20,000 m/s). Check your inputs — likely a typo in tCal or distance.
Check the Reference temperature in Settings. If non-20 °C, displayed speeds reflect temperature compensation. The app shows "ref X @ 20°C" underneath compensated speeds so you can verify.
Old history entries created before app version 1.75 might not have stored the temperature. If you took the measurement at a non-20 °C temperature, replay will use the current setting. Manually set the temperature in Settings before replaying, OR re-measure.
Markers auto-place based on input geometry. Drag them to adjust. Adjusting markers updates the source position in the photo overlay — but does NOT change the underlying calculation result.
Make sure you're using a backup file generated by the same or newer version of the app. Older backup files might lack current data fields.
By design: when you blur a numeric field (tap elsewhere), if it's empty, negative, or contains non-numeric text, it snaps to 0. Prevents silently broken calculations from accidentally cleared inputs. The temperature input is exempt (it clamps to -40/+200 instead).
Contact support@evdiag.net with:
- Your device model and OS version
- The app version (Settings → bottom of page)
- Description of what you tried
- Screenshots if possible
NVH Source Locator is developed by EVDiag. Visit https://evdiag.net for updates and resources.